Introductiona quick introduction
created: March 2024
by Pixelwars
Thank you for purchasing our theme. If you have any questions that are beyond the scope of this help file, you can sign in to our support forums with your Item Purchase Code. And please rate the theme on ThemeForest if you liked it. Thanks so much!
- Pixelwars Team
Support Forums
Any questions that are beyond the scope of this help file, use support forums.
Follow Us
Follow us on ThemeForest and don't miss new upcoming premium themes.
Rate Theme
If you liked the theme you can rate it on ThemeForest in your downloads menu.
Getting Startedthings to know before get started
We assume you have basic knowledge of WordPress. In this doc you will learn how to setup, use and customize the theme.
Useful Resources
We've assembled some links to get you started:
Learn WordPress: Level up your WordPress skills.
- (Video) How to Find Help with WordPress
- (Video) WordPress Dashboard Overview
- (Video) How to Install a Theme
- (Video) How to Choose and Install Plugins
- (Video) Using the Theme Customizer
- (Video) Using the Media Library
- (Video) Intro to Publishing with the Block Editor
- (Video) Intro to the Block Directory
- (Video) Using WordPress in Other Languages
WordPress Documentation: A variety of resources to help you get the most out of WordPress.
- Getting Started: Learn about WordPress, both as a free software, and a community.
-
Basic Administration: Learn about your website's settings, permalinks, and other useful features.
- Administration Screens
- WordPress Block Editor - Blocks
- Pages Screen - Pages in WordPress
- Posts Screen - Posts Categories Screen - Posts Tags Screen
- Comments Screen - Comments in WordPress - Comment Moderation - Avatars
- Media Library Screen - Media Add New Screen - Edit Media
- Content Visibility
- Settings General Screen
- Settings Writing Screen
- Settings Discussion Screen
- Settings Media Screen
- Settings Permalinks Screen
- Customizing: Find the right plugins, widgets to make your site match your needs.
- Maintenance: Backup, PHP versions, streamlining or even automating your regular tasks.
WordPress Support Forums: Community-based Support Forums are a great place to learn, share, and troubleshoot.
- Fixing WordPress Forum: For any problems encountered after setting up WordPress.
- Requests and Feedback Forum: Feature requests; criticism.
- Everything else WordPress Forum: For relevant questions and problems not covered in the other forums.
Free Plugins: The WordPress Plugin Directory is the largest directory of free and open source WordPress plugins. Extend your WordPress experience with plugins.
Installationinstall theme
Install Theme
- Unzip the downloaded package from Themeforest and you will see the theme is under Theme folder in the package.
- Install the theme via WordPress admin panel.
- Go to: Appearance > Themes > Add New > Upload.
- You will see file upload form below, click on Choose Files button
- From there go to the directory where you have unzipped the package, then navigate to arf-package-v1.0.0(version may change)/Theme/1-Parent Theme and then select arf.zip file
- Install and activate the theme.
Note: This theme's file size is over 10 MB. Some hosts don't allow to upload over 8 MB. So, if you see an error message for the above way, please try the below ways.
OTHER WAYS TO INSTALL A THEME
Note: This theme uses custom image sizes. If you have images in your Media Library, run Regenerate Thumbnails plugin once. Install and activate the plugin then go to Tools > Regenerate Thumbnails.
Child Theme (for advanced users who are familiar with coding)
Child theme inherits the functionality and styling of the parent theme. Child theme is the recommended way of modifying the parent theme.
- This package includes a child theme.
Sample Datademo content
Import Demo Data
Importing demo data (posts, pages, theme settings, etc.) is the quickest and easiest way to set up your new theme. It allows you to simply edit everything instead of creating content and layouts from scratch.
System Requirements
Check out here for the system requirements you need in order to import demo data and use Elementor page builder. (If you are not sure whether or not your server support this, contact your host.)
There are two methods. Choose one of them. Some times low file upload size limit can stop you from uploading/importing files. In this case, you need to increase it. See this article for how to do it.
Method 1:
- Go to Appearance > Install Theme Plugins page. Install and activate recomended plugins one by one.
- Go to Appearance > Import Theme Demos page, and import a demo.
Method 2:
- Go to Appearance > Install Theme Plugins page. Install and activate recomended plugins one by one.
- Go to Tools > Import page.
- Choose the WordPress system. WordPress might offer you to install the "WordPress Importer" plugin, if you haven't installed it before do it now. Then run the importer.
- Once you've installed the "WordPress Importer" plugin, browse to the package folder, choose an XML data file under Sample Data folder, then and upload and import it.
- Go to Appearance > Menus page. In Manage Locations section, select imported menu and save changes.
Elementor Settings
Go to Elementor > Settings page. In General section, disable default colors and fonts to use theme style.
Regenerate Thumbnails
This theme requires different thumbnail sizes. Install and activate Regenerate Thumbnails plugin. Go to Tools > Regenerate Thumbnails page, and run the plugin once for all attachments. Then, deactivate Regenerate Thumbnails plugin.
Permalink Settings
Permalinks are the permanent URLs to your individual pages and blog posts, as well as your category and tag archives. A permalink is the web address used to link to your content.
- Go to Settings > Permalinks page.
- Set the "Post name" option as permalink structure.
- Save changes.
For more information
Elementorpage builder
Quickly create amazing websites for your clients or your business with complete control over every piece, without writing a single line of code.
- Download Elementor
- Plugin Requirements
- Plugin Documentation
- Video Tutorials
- Plugin Support Forum
- Elementor Academy
Elementor Settings
Go to Elementor > Settings > General:
- Disable Default Colors.
- Disable Default Fonts.
When creating a new page, choose Template: Elementor Canvas.
Pagesdefault and custom pages
Page Template
This theme has custom page templates you can use for certain pages that have additional features or custom layouts. You can see them in the Template dropdown menu in Page Attributes box of editing screen.
Sidebar
You can select sidebar from Sidebar box in editing screen.
Postsblog posts
Create blog posts for your blog page.
Create A Blog Post
- Go to: Posts > Add New.
- Enter title.
- Set featured media. (Image/Audio/Video)
- Assign to a category.
- Add tags.
- Select post format. (see formats below)
- Publish your post.
Post Formats
Change your post format for style and functionality. Select from Format box in editing screen.
- Standard: Regular post.
- Image: Like standard format, but has camera icon above post title.
- Gallery: Create a gallery from "Add Media" button. Make your gallery a slider from "Gallery Type" box.
- Audio
- Video
- Quote
- Link: First link has a background color.
- Chat
- Status: Background colored post content.
- Aside: Special background style for post content.
Specific Formats
CHAT
JOHN: Hey there

MARY: Aye, matey!

JOHN: Huh?
Portfolioportfolio posts
Activate Portfolio Posts
Go to "Appearance > Install Plugins". You can see the plugin "Pixelwars Core" in the list. Install the plugin. When you click the "Install" link, it will be installed and activated automatically. Then go to your main dashboard page. Now you can see the "Portfolio" menu.
Portfolio Menu
There are three sub menu under the portfolio menu:
- Portfolio: You can see all portfolio posts in a list. They are listed by the date. So you can change the publish date from publish box in edit screen to change post order in the table. This will also effect item ordering in your portfolio page.
- Add New: Create new portfolio items. (see instructions below)
- Portfolio Categories: You can assign a category to a post in edit screen. Categories appear as filter in your portfolio page. Also you can create multiple portfolio pages with categories. (see instructions below)
Create A Portfolio Post
Portfolio items are similar to blog posts.
- Go to: Portfolio > Add New.
- Enter title and set featured image.
- Assign to a category. This category will be displayed as a filter in your portfolio page.
- Use "Excerp" field to show a short description under the post title in your portfolio page.
- Choose post type from "Format" box. (see formats below)
- Publish your portfolio post. (Edit publish date to change post order)
Portfolio Post Formats
- Standard: Add your content to editor. This type of posts go to single view when click in portfolio page.
- Image: Displays post featured image in a lightbox.
- Gallery: Displays images in a lightbox. Create a gallery from Add Media button above the content editor.
- Audio: Displays an audio in a lightbox. Use browser address url of an audio from SoundCloud. Add the url to "URL" field in Featured Video box.
- Video: Displays a video in a lightbox. Use browser address url of a video from YouTube or Vimeo. Add the url to "URL" field in Featured Video box.
- Link: Enter your custom url to "URL" field in Featured Video box.
Note: You can see a box called "Gallery Type" in edit screen. The type
option effects content galleries when you view your portfolio post in individual
page.
Note: You can turn on above talked boxes from "Screen Options" panel in
upper right side if you do not see them in edit screen.
Portfolio Pages
There are two ways to build one or more portfolio pages.
- Portfolio Page Template: For single portfolio page.
- Portfolio Category Pages: For different portfolio pages. (see multiple portfolios below)
Make A Portfolio Page (with portfolio page template)
This page shows all published portfolio posts.
- Go to: Pages > Add New.
- Enter title.
- Select "Portfolio" template from Page Attributes box.
- Publish the page.
- Add this page to your navigation menu. (Appearance > Menus)
- Also, you can assign a sidebar to this page from Sidebar box.
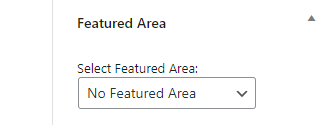
- Also, you can assign a featured area to this page from Featured Area box. (see featured area section for more information about the featured area)
Note: Add some text to content of the page to show it like a message in
your portfolio page.
Note: Play with post publish date to change item order in your portfolio
page.
Make Multiple Portfolio Pages (with portfolio category pages)
A portfolio category page shows its own published portfolio posts.
- Go to: Portfolio > Portfolio Categories > Add New Category. (parent category)
- Create portfolio posts assigned to this category.
- Add sub categories under this category to filter posts. (assign posts to sub categories)
- Add this portfolio category to your navigation menu. ("Appearance > Menus > Portfolio Categories". Show "Portfolio Categories" list from Screen Options panel in upper right side.)
- Every parent category displays its portfolio posts. So you can have different portfolios in your site.
Note: Add some text to description field of a category to show it like a
message in your portfolio category page. (Portfolio > Portfolio Categories > Edit >
Description)
Note: Play with post publish date to change item order in your portfolio
category page.
Portfolio Options in Customizer
Go to: Appearance > Customize > Portfolio.
- Page Layout: Adjust portfolio page width.
- Grid Type: Change image size in portfolio page.
- Grid Post Width: Adjust post width in portfolio page.
Overflow Images in Content
This setting is used in single view of portfolio posts.
Activate Overflowing Functionality
- Go to: Appearance > Customize > Single Post > Post Media Width.
- Set to "Overflow" option.
Enable Overflowing For Images
- Edit images in your content. Align an image as center from display settings.
Portfolio Sidebar
Control portfolio sidebar from Appearance > Customize > Sidebar:
- Portfolio Category Sidebar: Activate sidebar area for portfolio category pages.
- Portfolio Post Sidebar: Activate sidebar area for single portfolio posts.
Sidebar for Portfolio Page Template: Adjust sidebar from Sidebar box in edit screen.
Portfolio Widget Area: You can see the Portfolio Sidebar widget area listed in the Widgets page under Appearance menu.
Widgetscustom widgets
Custom Theme Widgets
This theme has custom widgets.
- Go to: Appearance > Widgets.
- Drag and drop widgets to widget areas.
Available Widgets
- Main Slider: Display your site's posts. Use in the Featured Area.
- Intro: Show a brief description with an image in the Featured Area.
- About Me: Show a brief description with an image in the sidebar.
- Link Box: Make a link with an image in the Featured Area.
- Social Media Feed: Display your social media feed for available networks.
- Social Media Icon: Add social media icons for your social media profiles.
Note: Check out Plugins section for "Subscribe" and "Trending Posts" widgets.
Intro Widget
Background Self-Hosted Video: You need to upload one MP4 format video.
Background Embed Video: Use an embed code of any YouTube, Vimeo video.
Example: (Vimeo)
<iframe src="https://player.vimeo.com/video/111529240?autoplay=1&loop=1" width="640" height="360" frameborder="0" webkitallowfullscreen mozallowfullscreen allowfullscreen></iframe>
Note: ?autoplay=1 and &loop=1 are optional.
Featured Areawith custom widgets
Available Featured Area Locations
- Blog Featured Area: For blog page.
- Portfolio Featured Area: For portfolio page.
- Shop Featured Area: For shop page. (WooCommerce plugin)
- Page Featured Area: For any page.
Set a featured area for your page from the "Featured Area" section in the page edit screen.
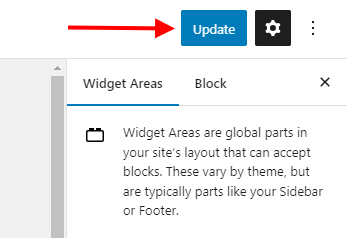
Create A Featured Area
- Go to Appearance > Widgets.
- Add "Main Slider", "Link Box" or "Intro" widgets to a featured area.
- Give title to widgets.
- Save widgets by clicking the "Update" button.
Main Slider Widget
Main Slider displays latest blog posts or sticky blog posts.
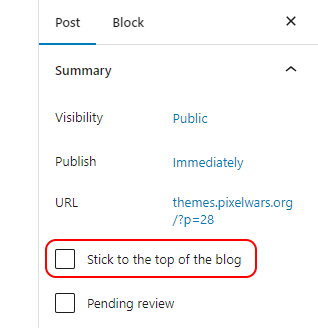
How To Make A Post Sticky
Set your post as sticky from the "Summary" section in the post edit screen.
Customizationpersonalization
Customizer
This theme supports the live theme customizer. You can customize almost every bit of your site from live customizer.
- Go to: Appearance > Customize.
Pluginspowerful plugins
Used Plugins
- Elementor Page Builder: Instant drag & drop lets you easily place every element on the page.
- Prime Slider - Addons for Elementor: A fast, fully customizable, functional slider builder.
- Qi - Addons for Elementor: The largest free library of custom and fully flexible Elementor widgets.
- WPForms Form Builder: Allows you to create beautiful contact forms for your site in minutes.
Translationlocalization
This theme is ready for localization. We have made every string translatable, use a plugin or an editor.
There is a POT file (arf.pot) under languages folder in the theme. It contains all theme texts
to translate. In here, translation is localization. Localization mean is not only changing words
to another language. It is basically changing texts to another texts. For example; if your local
is English (en-US) and in the theme there is title text Browsing Category for
category archives. You can change it what you want like Posts under Category in
your local.
Plugins
- Loco Translate (Recommended)
- Polylang
- TranslatePress
- qTranslate X
- Lingotek
- WPML
Editor
Note: The translation files are located under languages folder in theme folder.
Updateupdate theme
Update Your Theme
Before you update, it is best practice to always make a backup of your theme folder.
Download the new theme package from your ThemeForest account.
The theme is under "Theme" folder in the package.
Choose to upload the theme via Envato Market plugin or via WordPress or via FTP.
Update Your Theme via Envato Market Plugin
The Envato Market plugin can install WordPress themes purchased from ThemeForest by connecting with the Envato Market API using a secure OAuth personal token. Once your themes are installed WordPress will periodically check for updates, so keeping your items up to date is as simple as a few clicks.
Update Your Theme via WordPress
- You need to deactivate your theme in the "Appearance > Themes" section by simply activating a different theme. Once you activate a different theme, you can delete your theme. Don't worry, your content will not be lost. (The translation files are located under languages folder in the theme folder.)
- Then simply upload the new theme file in the "Appearance > Themes" section.
- Once it uploads, choose to activate the theme.
Update Your Theme via FTP
There are two ways of getting files onto your site, and once there, changing them.
- By using an FTP client.
- By using the file manager provided in your host's control panel.
- Go to "/wp-content/themes/" location and backup your current theme folder by saving it to your computer, or you can choose to simply delete it. Your content will not be lost. (The translation files are located under languages folder in the theme folder.)
- Retrieve the new zipped theme file from your new ThemeForest download, and extract the file to get the theme folder.
- Then simply drag-and-drop (Upload) the new theme folder into "/wp-content/themes/" location, and activate the theme in the "Appearance > Themes" section. (Choose to "Replace" the current one if you did not delete it.)
Creditsthanks to the creators of this great files
- Animated Resizing Header On Scroll
- Newsletter Envelope Style
- Post Like Heart Icon by Ivan Boyko
- Preloaders
- OwlCarousel
- FitText.js
- jQuery Flex Vertical Center
- Magnific Popup
- Social Photo Stream jQuery Plugin
- fontello
- normalize.css
- jQuery
- fastclick
- jquery validate
- Fluidbox
- Fitvids.js
- css form elements styling
- Article Publishing Guide by Readability
- hAtom 1.0 microformat
- Bootstrap
- Google Fonts
- OwlCarousel2
- Isotope
- CollagePlus
- jQuery Validation Plugin
- imagesLoaded
- AntiSpam for Contact Form
- Navicon Transformicons
- CSS Note Style