Thank you for purchasing our theme. If you have any questions that are beyond the scope of this help file, you can sign in to our support forums with your Item Purchase Code. And please rate the theme on ThemeForest if you liked it. Thanks so much!
- Pixelwars Team
Support Forums
Any questions that are beyond the scope of this help file, use support forums.
Visit Support Forums
Rate Theme
If you liked the theme you can rate it on ThemeForest in your downloads menu.
Rate on ThemeForest
We assume you have basic knowledge of WordPress. In this doc you will learn how to setup, use and customize the theme.
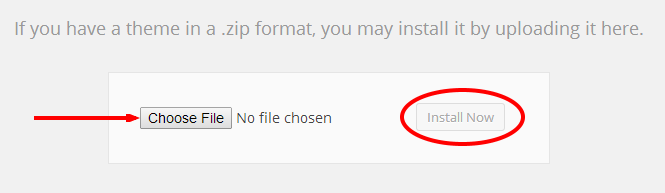
Install Theme
Install the theme via WordPress admin.
Go to: Appearance > Themes > Add New > Upload.
Install and activate the theme.
OTHER WAYS TO INSTALL A THEME
Important
This theme uses custom image sizes. If you have images in your Media Library, run Regenerate Thumbnails plugin once.
Sample Data
Go to: Tools > Import > WordPress.
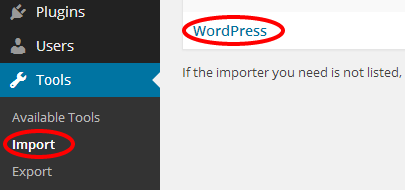
WordPress might offer you to install the WordPress Importer plugin, if you haven't installed it before do it now.
Install and activate the plugin.
Once you've installed WordPress Importer plugin, browse to the package folder, select XML data file and upload it.
Go to: Settings > Reading. Select homepage and blog page.
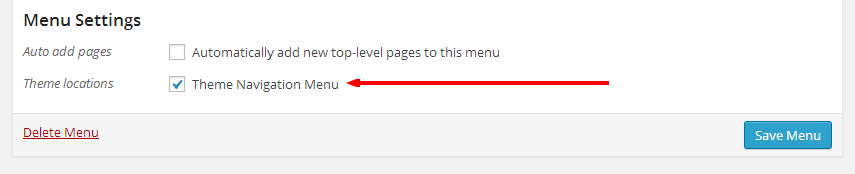
Go to: Appearance > Menus. Select theme location for the imported custom menu.
Custom Menu
Go to: Appearance > Menus. Create a custom menu.
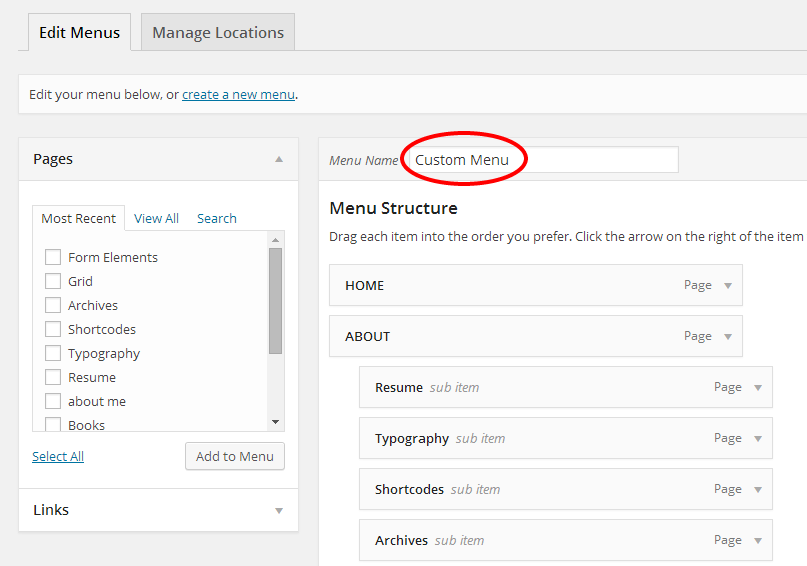
Check theme location for the custom menu.
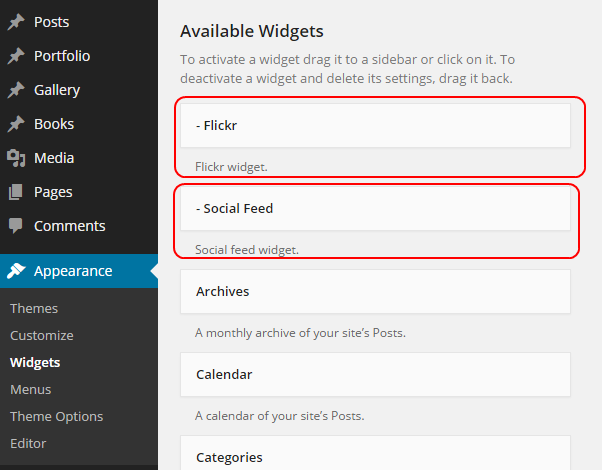
Custom Theme Widgets
This theme has custom widgets. Drag and drop widgets to widget locations.
Go to: Appearance > Widgets.
How To Update The Theme
Before you update, it is best practice to always make a backup of your theme folder.
Download the new theme package from your ThemeForest account.
The theme is under "Theme" folder in the package.
Choose to upload the theme via WordPress or via FTP.
Update Your Theme via WordPress
- You need to deactivate your theme in the "Appearance > Themes" section by simply activating a different theme. Once you activate a different theme, you can delete your theme. Don't worry, your content will not be lost. (The translation files are located under languages folder in the theme folder.)
- Then simply upload the new theme file in the "Appearance > Themes" section.
- Once it uploads, choose to activate the theme.
Update Your Theme via FTP
There are two ways of getting files onto your site, and once there, changing them.
- By using an FTP client.
- By using the file manager provided in your host's control panel.
- Go to "/wp-content/themes/" location and backup your current theme folder by saving it to your computer, or you can choose to simply delete it. Your content will not be lost. (The translation files are located under languages folder in the theme folder.)
- Retrieve the new zipped theme file from your new ThemeForest download, and extract the file to get the theme folder.
- Then simply drag-and-drop (Upload) the new theme folder into "/wp-content/themes/" location, and activate the theme in the "Appearance > Themes" section. (Choose to "Replace" the current one if you did not delete it.)
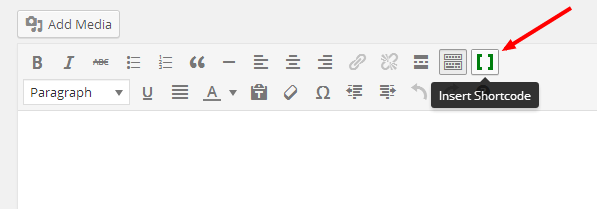
Shortcode Generator
Use shortcode generator to add shortcodes. Click the "Insert Shortcode" button from the content editor.
Post Formats
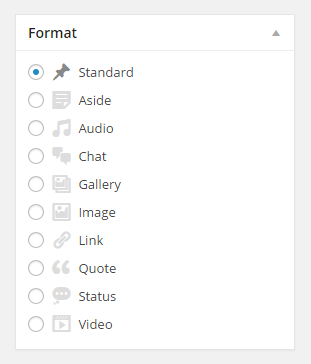
Chat:
Write this type of conversation.
Example:
JOHN: Hey there

MARY: Aye, matey!

JOHN: Huh?
Gallery:
Create WordPress gallery or use slider shortcode.
Example:
[slider items="" loop="" center="" mouse_drag="" nav="" dots="" autoplay="" speed="" timeout=""]
[slide title="" image=""]
[slide title="" image=""]
[slide title="" image=""]
[/slider]


items="" ... 1

loop="" ... true, false

center="" ... true, false

mouse_drag="" ... true, false

nav="" ... true, false

dots="" ... true, false

autoplay="" ... true, false

speed="" ... 600 (millisecond)

timeout="" ... 2000 (millisecond)

image="" ... An image url. Upload your image to your Media Library, then copy its url and use in this parameter.

title="" ... Image caption.


Example 1:

[slider]
[slide image="image-url-here"]
[slide image="image-url-here"]
[slide image="image-url-here"]
[/slider]


Example 2:

[slider items="1" loop="true" center="false" mouse_drag="true" nav="true" dots="true" autoplay="false" speed="600" timeout="2000"]
[slide title="Image Caption Here" image="image-url-here"]
[slide title="Image Caption Here" image="image-url-here"]
[slide title="Image Caption Here" image="image-url-here"]
[/slider]
Quote:
Use [quote] shortcode.
Example:
[quote align="" name=""]Text here.[/quote]


align="" ... alignleft, alignright
Activate
Activate the slider from Theme Options > Main Slider > Activate.
Main Slider shows sticky posts.
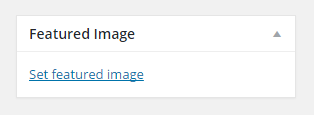
Go to: Posts > Add New.
Set featured image.
Edit visibility options to make sticky post.
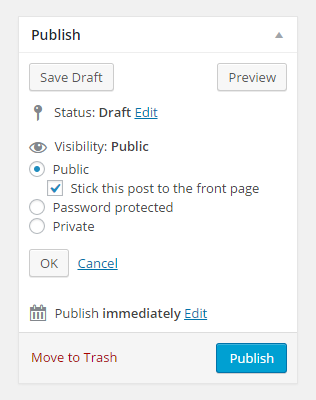
Publish your post.
Important
This theme uses custom image sizes. If you have images in your Media Library, run Regenerate Thumbnails plugin once.
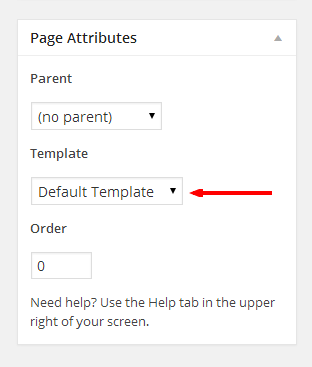
Template
This theme have custom page templates you can use for certain pages that might have additional features or custom layouts. You can see them in the Template dropdown menu.
Select a template for your pages from Page Attributes box.
Portfolio Page
- Create a page.
- Select "Portfolio" template for your page from Page Attributes box in the editing screen of your page.
- Publish your page.
- Add your page to your custom menu from Appearance > Menus.
- Portfolio page shows portfolio items.
Add Portfolio Item
Note: If you have images in your site, use Regenerate Thumbnails plugin once.
Go to: Portfolio > Add New.
Set featured image.
Select type.
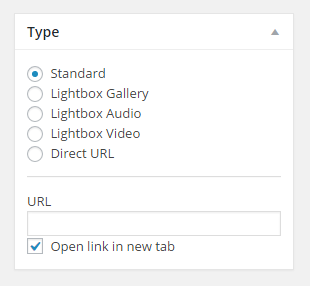
Portfolio Item Types
- Standard: Use content editor.
- Lightbox Gallery: Create a gallery in the content. (See below)
- Lightbox Audio: Use URL input. (Find soundcloud audio url within iframe embed code)
- Lightbox Video: Use URL input. (Find video url within iframe embed code)
- Direct URL: Use URL input.
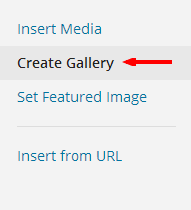
Click Add Media button above the content editor.
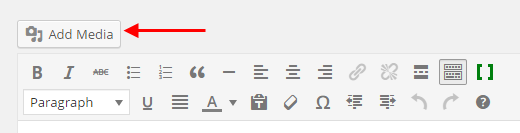
Choose "Create Gallery" and select multiple images.
Multiple Portfolios
Note: Read carefully and try to understand how this functionality works.
You need a page with the template “Portfolio” if you want to use only one page portfolio on your site. But you don’t need any page for multiple portfolios on your site. Because the unlimited portfolio functionality doesn’t need any page to show portfolio items on your site. It works based on departments.
In multiple portfolios, every parent department works like a different portfolio page.
Shortly:
Create parent departments. They will be your different portfolio pages. And create sub departments for your parent departments. These will be your portfolio filters.
Go to Appearance > Menus. Open the Departments box from the Screen Options panel.
Add your parent departments to your menu. These are portfolio pages.
Add new portfolio items to your sub departments.
Galleries Page
Create a page. Select "Gallery" template from Page Attributes box.
Add Gallery
- Go to: Gallery > Add New.
- Set featured image.
- Click "Add Media" button above the content editor.
- Choose "Create Gallery" and select multiple images.
Books Page
Create a new page. Select "Books" template from Page Attributes box.
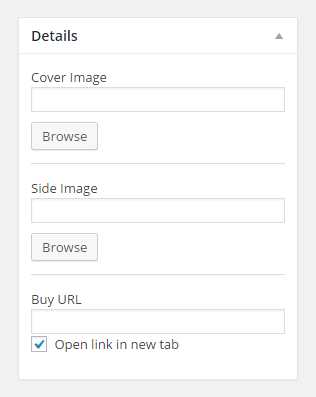
Add Book
Go to: Books > Add New.
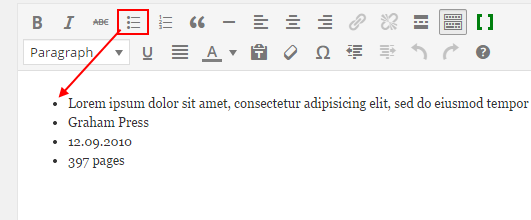
Use content editor and Details box.
Shortcode Generator
Use shortcode generator to add shortcodes. Click the "Insert Shortcode" button from the content editor.
All Shortcodes
Grid
[row]
Column shortcode here.
[/row]


[column width=""]
Content here.
[/column]


width="" ... 1 to 12. (required). 12 = 100%, 6 = 50%, 3 = 25%.

width_xs="" ... 1 to 12. (optional). Extra small devices - Phones (<768px).

width_md="" ... 1 to 12. (optional). Medium devices - Desktops (≥992px).

width_lg="" ... 1 to 12. (optional). Large devices - Desktops (≥1200px).


Example 1: (Two Columns)

[row]
[column width="6"]
Content here.
[/column]
[column width="6"]
Content here.
[/column]
[/row]


Example 2: (Three Columns)

[row]
[column width="4"]
Content here.
[/column]
[column width="4"]
Content here.
[/column]
[column width="4"]
Content here.
[/column]
[/row]


Example 3: (Four Columns)

[row]
[column width="3"]
Content here.
[/column]
[column width="3"]
Content here.
[/column]
[column width="3"]
Content here.
[/column]
[column width="3"]
Content here.
[/column]
[/row]
section_title
[section_title align="" text=""]


align="" ... center


Example 1:

[section_title text="My Title"]


Example 2:

[section_title align="center" text="My Title"]
button
[button text="" url="" target="" color="" size="" icon=""]


target="" ... _blank

color="" ... red, green, blue, yellow

size="" ... big.

icon="" ... heart, paper-plane, down-outline, thumbs-up


Example:

[button text="My Button" url="http://www.example.com"]
launch_button
[launch_button]Button shortcode here.[/launch_button]


Example:

[launch_button][button text="My Button" url="http://www.example.com"][/launch_button]
call_to_action
[call_to_action title="" text=""]Button shortcode here.[/call_to_action]


Example:

[call_to_action title="My Title" text="My description"][button text="My Button" url="http://www.example.com"][/call_to_action]
project_action
[project_action]Button shortcode here.[/project_action]


Example:

[project_action]
[button text="Preview" url="http://www.example.com/preview/"]
[button text="Download" url="http://www.example.com/download/"]
[/project_action]
social_icon
[social_icon_wrap]
[social_icon type="" same_tab="" url=""]
[social_icon type="" same_tab="" url=""]
[social_icon type="" same_tab="" url=""]
[/social_icon_wrap]


same_tab="" ... yes

type="" ...

facebook, twitter, linkedin, google-plus,

pinterest, github, behance, dribbble, instagram,

lastfm, vimeo, forrst, skype, picasa, youtube, flickr,

tumblr, blogger, delicious, digg, friendfeed, wordpress,

foursquare, xing, soundcloud, slideshare, fivehundredpx,

weibo, stack-overflow, vine, vkontakte, rss


Note: You can use your site's feed url for the rss icon: http://www.yoursite.com/feed/


Example 1:

[social_icon_wrap]
[social_icon type="facebook" url="http://www.facebook.com/username"]
[social_icon type="twitter" url="http://twitter.com/username"]
[/social_icon_wrap]


Example 2:

[social_icon_wrap]
[social_icon type="facebook" same_tab="yes" url="http://www.facebook.com/username"]
[social_icon type="twitter" same_tab="yes" url="http://twitter.com/username"]
[/social_icon_wrap]
intro & rotate_words
[intro]
[rotate_words titles=""]
[/intro]


titles="" ... Seperate with commas.


Example:

[intro]
Hello. I am a [rotate_words titles="writer,freelancer"]
[/intro]
tagline
[tagline]Text here.[/tagline]
drop_cap
[drop_cap]Text here.[/drop_cap]
quote
[quote align="" name=""]Text here.[/quote]


align="" ... alignleft, alignright
alert
[alert type=""]Text here.[/alert]


type="" ... success, error.


Example 1:

[alert]My alert text.[/alert]


Example 2:

[alert type="success"]My alert text.[/alert]


Example 3:

[alert type="error"]My alert text.[/alert]
contact_form
[contact_form captcha="" to="" subject=""]


to="" ... Your email address.

captcha="yes"


Example:

[contact_form to="yourname@example.com" subject="New Message from My Site"]
latest_from_the_blog
[latest_from_the_blog items=""]


items="" ... Number of items to show.


Example:

[latest_from_the_blog items="5"]
slider
[slider items="" loop="" center="" mouse_drag="" nav="" dots="" autoplay="" speed="" timeout=""]
[slide title="" image=""]
[slide title="" image=""]
[slide title="" image=""]
[/slider]


items="" ... 1

loop="" ... true, false

center="" ... true, false

mouse_drag="" ... true, false

nav="" ... true, false

dots="" ... true, false

autoplay="" ... true, false

speed="" ... 600 (millisecond)

timeout="" ... 2000 (millisecond)

image="" ... An image url. Upload your image to your Media Library, then copy its url and use in this parameter.

title="" ... Image caption.


Example 1:

[slider]
[slide image="image-url-here"]
[slide image="image-url-here"]
[slide image="image-url-here"]
[/slider]


Example 2:

[slider items="1" loop="true" center="false" mouse_drag="true" nav="true" dots="true" autoplay="false" speed="600" timeout="2000"]
[slide title="Image Caption Here" image="image-url-here"]
[slide title="Image Caption Here" image="image-url-here"]
[slide title="Image Caption Here" image="image-url-here"]
[/slider]
tab
[tab_wrap titles="" active=""]
[tab]Text here.[/tab]
[tab]Text here.[/tab]
[tab]Text here.[/tab]
[/tab_wrap]


titles="" ... Separate with commas.


Example:

[tab_wrap titles="Tab One,Tab Two,Tab Three"]
[tab]
Tab one text here.
[/tab]
[tab]
Tab two text here.
[/tab]
[tab]
Tab three text here.
[/tab]
[/tab_wrap]
accordion
[accordion_wrap]
[accordion title=""]Text here.[/accordion]
[accordion title=""]Text here.[/accordion]
[accordion title=""]Text here.[/accordion]
[/accordion_wrap]
toggle
[toggle_wrap]
[toggle title=""]Text here.[/toggle]
[toggle title=""]Text here.[/toggle]
[toggle title=""]Text here.[/toggle]
[/toggle_wrap]
service
[service icon="" title="" text=""]
fun_fact
[fun_fact icon="" text=""]
skill
[skill_wrap]
[skill title="Fireworks" percent="90"]
[skill title="Photoshop" percent="70"]
[skill title="Illustrator" percent="50"]
[/skill_wrap]
testimonial
[testimonial_wrap]
[testimonial image="" title="" sub_title=""]Description text here.[/testimonial]
[testimonial image="" title="" sub_title=""]Description text here.[/testimonial]
[testimonial image="" title="" sub_title=""]Description text here.[/testimonial]
[/testimonial_wrap]


title="" ... Person's name.

sub_title="" ... Person's job.

image="" ... An image url. Upload your image to your Media Library, then copy its url and use in this parameter.
tag
[tag_wrap]
[tag text=""]
[tag text=""]
[tag text=""]
[/tag_wrap]
link_wrap
[link_wrap]Link here.[/link_wrap]
aside_wrap
[aside_wrap]Text here.[/aside_wrap]
timeline
[timeline]
[event_group_title icon="" text=""]
[event current="" date="" title="" sub_title=""]Text here.[/event]
[event current="" date="" title="" sub_title=""]Text here.[/event]
[event current="" date="" title="" sub_title=""]Text here.[/event]
[/timeline]


icon="" ... bookmark-empty, graduation-cap

current="" ... current
Full-width Images
Edit images in your content. Add full keyword as a CSS class to your image from advanced options.
Icons
Available icons here. Select your icon from the list. Don't use the prefix pw-icon-. Only use icon name for the icon="" parameter of the shortcodes.
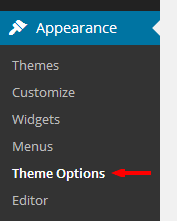
Theme Options
This theme has a settings panel for customization.
Go to: Appearance > Theme Options.
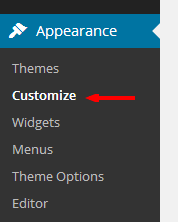
Theme Customizer
This theme supports the live theme customizer.
Go to: Appearance > Customize.
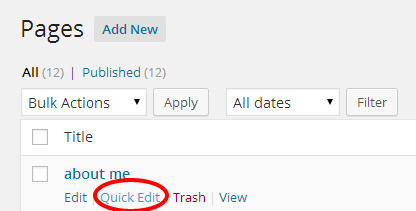
Disable Comments
Every post/page has a "Quick Edit" link when you hover in the item list. Click the link to open "QUICK EDIT" menu then uncheck the "Allow Comments" option.
This theme is ready for localization. We have made every string translatable, use a plugin or Poedit editor.
Some Plugins
- Loco Translate
- Codestyling Localization
Note: The translation files are located under languages folder in the theme folder.